Replace default UI header font with Google Sans
FydeOS Community customization guides Support and HelpTips and Tricks

Hello there!
This guide will assist you to change the default UI header font with Google Sans, which is the font used on certain Android, ChromeOS devices making it far easy for the eyes to read thus making your user interface visually pleasing.
This is made possible by replacing Arimo inside /usr/share/fonts/croscore (Arimo is the de-facto default font for WebUI in instances where Roboto cannot be used.
This affects elements such as the Quick Settings menu at the lower-right screen for bottom-shelf users (Best paired with the Revamped Quick Settings flag. Enable this by heading over to chrome://flags#qs-revamp) and other websites that uses Arimo.
Before we proceed with the process, I would like to state that:
Doing these requires knowledge in the Linux file architecture and the command-line interface. Make sure to carry out these steps properly as I would not be liable in misconfigured stuff or anything. Before doing all of these steps, always do it on a USB installation or a safe environment first until you are now sure to repeat these steps on your main disk. …Unless you are sure you know what you are doing, always keep in mind that you are doing these steps AT YOUR OWN RISK.
First step:
Open the crosh terminal by pressing ctrl+alt+T. This will open the developer shell. This is also where you will do the steps below.
Second Step
Type shell on the first screen to access the developer Bash shell. This will take you to this screen:

Disable read/write restrictions by inputting
sudo mount -no remount,rw /
This will let us do the necessary steps on configuring the fontfiles and its configurations.
Third Step
Open your Files app and create a new folder by right-clicking My Files. or pressing ctrl+E
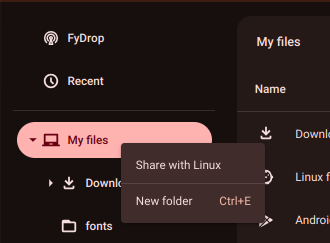
Rename your newly-created folder to croscore

This is where we would be placing the necessary fontfiles.
Fourth Step
In order to show Google Sans on our screen, of course we would need our Fonts.
Download the fonts by following this hyperlink and unzip them to your croscore folder once it has finished downloading.
To unzip the font package, double-click the newly downloaded zip file to see its contents. It should take you to this screen:

To move these to your croscore folder, we would be doing a quick (and very convenient) trick, select all of the contents inside by pressing ctrl+A and drag them using your mouse by pressing Left click and drop them to your croscore folder that you’ve made earlier.
…Or if you are a visual learner type of person, follow this one as enacted:
Fifth Step
After we have prepped the necessary files for the procedure, open the developer shell that you have launched earlier. But before we move these fonts, we would first introduce some minor tweaks to the local font configuration file in order to avoid problems such as text being over-stretched and oversharpened characters.
To do this, open your developer shell and type:
sudo nano /etc/fonts/local.conf
After that, It should take you to this section as shown below:

Note - Please note that mouse controls are not supported in Nano so we would be using scroll and arrow keys to navigate around the file.
After that, locate the font configuration file for Arimo as shown in the picture below:

Carefully, delete the lines below the <test name="family"><string>Arimo</string></test> tag until it reaches the </match> tag,
Use your arrow keys or scroll your way to navigate to the said line and use the ← Backspace key to remove them. It should look like this when properly deleted:

Then, type this code snippet MANUALLY for you to put inside the configuration file:
    <edit name="hinting" mode="assign"><bool>false</bool></edit>
    <edit name="hintstyle" mode="assign"><const>hintfull</const></edit>
    <edit name="autohint" mode="assign"><bool>false</bool></edit>
    <edit name="antialias" mode="assign"><bool>true</bool></edit>
Make sure to double check for any missing syntax characters.
This will fix some issues pertaining to font compatibility and display. It should look like this when perfectly typed:

after that, save the text file by pressing ctrl+S, followed by ctrl+X to exit the text editor.
Sixth Step
Now that we have properly configured our local.conf file, we will now move the files from the My Files folder to the system directory.
To do this, move your working terminal directory to the system fonts folder and doing a quick file listing by typing:
cd /usr/share/fonts; sudo ls
Then, rename the factory croscore folder to back up just incase you would want to go back. This is done by typing:
sudo mv croscore croscora
And again, do a quick directory listing by repeating the cd command above.
This should be the output:

Then, copy the fontfiles from your Home directory to the system font directory by typing:
sudo cp ~/MyFiles/croscore croscore -r
After it has been copied, double check the contents by typing:
sudo ls /usr/share/fonts/croscore
Give the new croscore folder the same file permissions by running:
sudo chmod -R --reference=/usr/share/fonts/crosextra /usr/share/fonts/croscore
This prevents future issues on running the new fontfiles, authenticating it as a valid system file.
After executing the commands above, we could now proceed to the next step.
Seventh step
Register the newly-transferred fonts to the system’s font cache by running:
sudo fc-cache -rfv; sudo fc-cache -fv
To verify that we have installed the correct font files, run:
sudo fc-list | grep -i Arimo
This should be the expected output:

if 4 Arimo entries shows up, congratulations! we have installed them correctly.
After that, we’re now up to the final step.
Final step
Open Chromium and type this on the URL box above:
chrome://restart
to do a quick restart without needing to log in. This should refresh everything, allowing the new fonts to display correctly.
You may also do a System Restart to get even better results.
After doing the following steps above, this is what your FydeOS UI would look like with Google Sans:
Quick settings menu

Apps/Search and Launcher menu


Notifications and Tote bar


WebView layout:


There would also be a very noticeable refresh in the Lockscreen. However, it is not possible to take a screenshot inside so it is yours to find out and discover!![]()
If you wish to restore back the original croscore fontfiles, delete the existing croscore files inside the system font directory (refer to Sixth, Seventh Step) and rename croscora to croscore.
Thanks for reading! Let me know any of your questions and your thoughts below. Give it a heart if it works! Let me know if any of the links above become non-functional or any bugs that you may encounter.